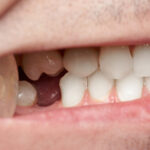
Are you having problems with broken dentures? Maybe they fall out when you eat or drink or hurt when you talk or smile. If so, you’re not alone.
But there’s no need to worry. You can quickly learn how to handle that with a guide to fixing broken dentures. That way, you can enjoy your meals again, eat and drink, and have the freedom to smile comfortably.
Keep reading for a complete breakdown of how to fix broken dentures and prevent future issues.
Assessing the Damage
The first step in fixing broken dentures is assessing the damage. Look at the dentures carefully to determine the extent of the fracture. Make sure you are aware of any parts that may have broken off.
If it was due to an accident, locate any missing pieces that may have landed on the floor or in the vicinity. Examine the location of the fracture and the force and pressure exerted by the damaged dentures.
Based on the extent of the damage, you will be able to determine the necessary steps to take to fix it. You may need a new denture piece or to repair the existing piece.
Clean the Dentures
Step one in fixing broken dentures is to start by cleaning them. Doing this will help make sure no bacteria or grit has accumulated on or around the fixtures or breakage locations. First, use a soft bristle toothbrush to scrub the denture with a denture cleaning agent.
Be sure to avoid using regular toothpaste as it is abrasive and could cause more damage to the dentures. Make sure to pay special attention while brushing around the fixtures. Finish up by rinsing the dentures with warm water and drying them off with a soft cloth.
Reattach the Broken Pieces Carefully
The next step is to apply a denture adhesive to both pieces of the denture and wait a few minutes before putting them back together. Make sure the adhesive is fully dry before reapplying the pieces together. Make sure the denture fits comfortably and securely against your gums before allowing the adhesive to set.
Once set, lightly blot the heated area with a damp cloth to remove excess adhesive, and double-check that it securely fits. If the broken dentures don’t feel secure, reapply the adhesive and give them another few minutes to dry. Enjoy the restored fit and feel of your dentures!
Fit and Use a Metal File to Clean The Edges
When fixing broken dentures, it is important to use a metal file to clean the edges. Make sure that the denture is free of any sharp edges or jagged pieces. Once all the debris has been removed, use a metal file to ensure the edges are clean and smooth.
Start at the point where the break occurred, in a circular motion. Gradually move outward ensuring the file is continuously moving until the surface is smooth to touch. This will ensure that the dentures are properly fitted and no further harm will be done.
If you believe these steps are helpful, you can do the same again, should the need arise. Thus, make sure to make your own dentures kit and be ready.
Explore How to Fix Broken Dentures Today
Following this step-by-step guide on how to fix broken dentures is beneficial. Broken dentures can be managed and maintained from at-home quick fixes to professional restoration.
Don’t let broken dentures get in the way of your appearance and comfort – take the necessary steps and get the smile of your dreams.
For more reads aside from repairing broken dentures, visit our blog.